In the realm of modern automobiles, Toyota is renowned for its reliability and performance. As a testament to their commitment to ensuring their vehicles operate in optimal condition, Toyota equips its cars with sophisticated diagnostic systems. One common feature found in many Toyota models is the Maintenance Required light, often represented by a simple yet impactful wrench icon.
This unassuming light serves as a reminder for scheduled maintenance, encompassing crucial tasks such as oil changes and tire rotations. In this comprehensive guide, we will explore how to reset the Maintenance Light on your Toyota, ensuring your vehicle continues to perform at its best.
Understanding the Maintenance Light
The Maintenance Required light on your Toyota’s dashboard is not just a random, flickering indicator. It’s a critical reminder for scheduled maintenance tasks specified in your owner’s manual. This encompasses essential services such as oil changes, tire rotations, and various routine maintenance duties. Perceiving the significance of this light is the most vital phase in going to proactive lengths to keep up with your vehicle’s wellbeing and execution.
Ignoring this light can prompt a decrease in eco-friendliness, an expansion in mileage on basic parts, and likely breakdowns. Regular maintenance ensures that your Toyota runs efficiently, prolonging its lifespan and safeguarding its value.
Regular maintenance is a cornerstone of your vehicle’s longevity and performance. It not only guarantees that your car operates at peak efficiency but also aids in the early identification and rectification of potential issues before they escalate into costly problems. The benefits of adhering to your maintenance schedule extend to improved fuel efficiency, enhanced safety through timely inspections, and the preservation of your Toyota’s resale value.
Resetting the Maintenance Light
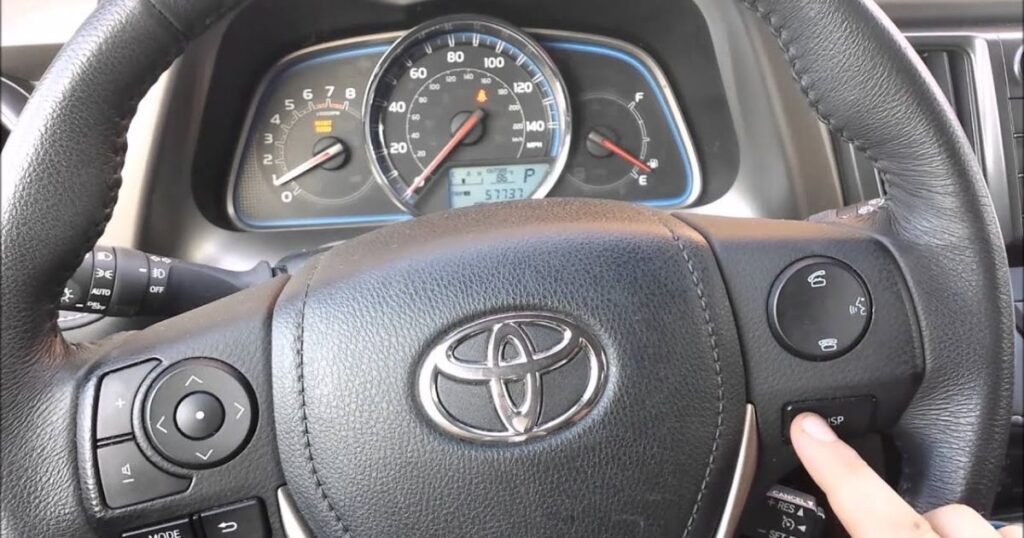
Resetting the Maintenance Light can be accomplished using various methods, depending on your specific Toyota model. Two normal techniques are manual resets and odometer resets, yet it’s essential that the strategy can shift starting with one model then onto the next. The key is to counsel your vehicle’s proprietor’s manual to find the right cycle customized to your particular model.Manual Reset: For this technique, begin with the vehicle switched off turn the way in to the “Off” position
Locate the trip odometer button, often found near the speedometer. While holding this button, turn the key to the “Off” position. Keep the button pressed while turning the key back to the “On” position. After a few seconds, you will notice the Maintenance Light extinguish, indicating that the reset has been successful.
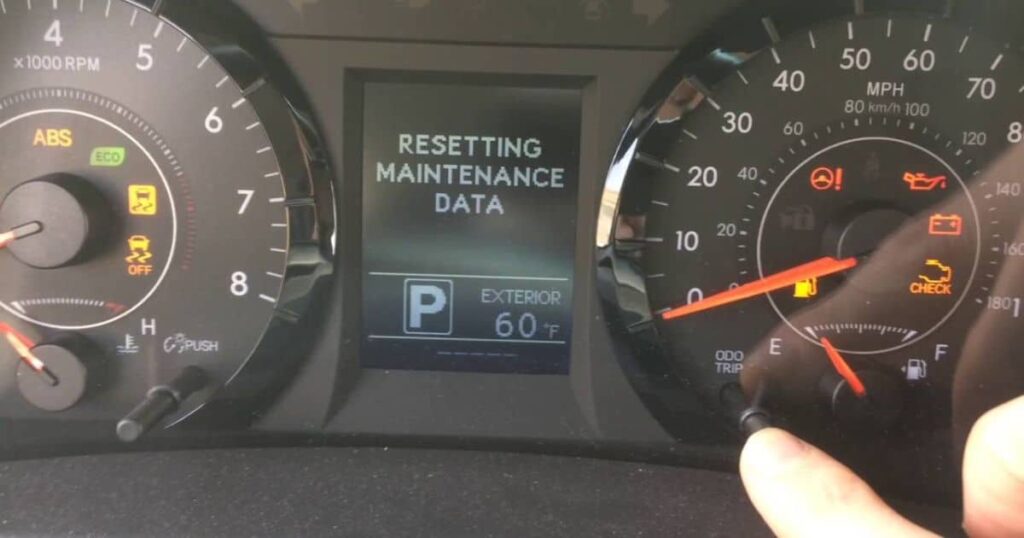
Odometer Reset: In contrast, the odometer reset method involves starting with the vehicle turned off and turning the key to the “On” position without starting the engine. Ensure that the odometer display is set to “Trip A.”Turn the way into the “Off” position. While holding the reset button, turn the vital back to the “On” position. Following a couple of moments, discharge the reset button, and the Upkeep Light will go out.
Model-Specific Procedures
Given the variations among Toyota models, it is essential to recognize that the reset procedure can differ. Some newer models may necessitate the use of the onboard computer or even a diagnostic tool to reset the Maintenance Light accurately. To avoid any uncertainty, always consult your owner’s manual for precise, model-specific guidance.
Knowing when to reset the Maintenance Light is as vital as knowing how to reset it. Typically, you should reset it after each scheduled maintenance service or after performing DIY maintenance. Resetting the light ensures that it accurately reflects the next service interval, allowing you to keep track of your vehicle’s maintenance schedule efficiently.
When to Reset the Light
In the world of modern automobiles, Toyota stands as a trusted name synonymous with reliability and performance. Many Toyota vehicles are equipped with advanced diagnostics systems, and one common feature is the Maintenance Required light, often represented by a wrench icon. This light serves as a valuable reminder for scheduled maintenance, including tasks like oil changes and tire rotations.
In this guide, we’ll explore how to reset the Maintenance Light on your Toyota, ensuring your vehicle remains in top condition. Understanding the significance of this light, the importance of timely maintenance, and the various reset methods available, including manual and odometer resets, is key to keeping your Toyota performing at its best. Always consult your vehicle’s owner’s manual for model-specific guidance and remember to reset the light after each scheduled maintenance service to maintain your vehicle’s peak performance.
After Words
The Maintenance Light on your Toyota is a valuable reminder, a nudge from your vehicle to ensure it receives the care it needs. Regular maintenance is not just a recommendation; it’s a fundamental element of preserving your vehicle’s performance, longevity, and value. By correctly resetting the Maintenance Light, you acknowledge the completion of maintenance tasks and initiate the countdown to the next service.
To ensure a precise reset procedure, always refer to your owner’s manual, and follow it diligently. By doing so, you will experience many more miles of safe and reliable driving in your trusted Toyota, knowing that you’ve mastered the art of resetting the Maintenance Light.